
Key Takeaway
From this article, you learned:
- What a radiant barrier attic installation is and how it helps reduce heat transfer in your home.
- The most effective radiant barrier installation methods, with stapling to the roof rafters, giving the best results.
- Why attic floor installation is less effective but can still block up to 95% of radiant heat.
- Special cases for radiant barrier installation, including cathedral ceilings, siding, and roofing systems.
- How to install a radiant barrier safely by preparing your attic, using the right tools, and leaving a proper air gap.
- Common mistakes to avoid during radiant barrier installation methods, such as blocking vents or pressing the foil flat.
- Maintenance tips to keep your radiant barrier working for many years, including cleaning, inspections, and moisture control.
By understanding the different radiant barrier installation methods and the steps for how to install a radiant barrier correctly, you can choose the best option for your home. With the right radiant barrier attic installation, you’ll enjoy lower energy bills, better comfort, and long-term protection for your insulation and ductwork.
Why Radiant Barrier Installation Is the Smart Choice for Energy Efficiency
In a world where energy efficiency and sustainable living are becoming increasingly important, one easy solution stands out for cooling homes and keeping them comfortable while reducing energy consumption: radiant barrier installation. By harnessing the power of reflective technology, radiant barriers offer an innovative approach to help you insulate your house, reduce heat flow, and minimize heat transfer. This article explores the fascinating world of radiant barrier installation and uncovers the best installation methods.
METHODS TO INSTALL A RADIANT BARRIER
PLACE THEM AGAINST THE RAFTERS
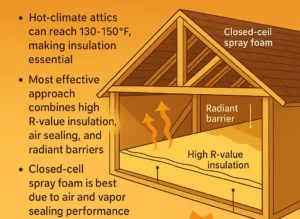
A radiant barrier is a foil insulation that works as a reflective insulation. You can place it directly against the bottom side of your rafters, just below the roof line on the wood. This method is generally best in hot climates like L.A. in order to get the highest possible energy savings per year.
INSTALL THEM OVER THE ATTIC INSULATION
You can also install the foil over insulation that is already inside your attic ceiling, between the roof rafters. This method is usually used in colder climates because it maximizes the heat retention of the attic space while helping during the colder months as well, even in places like Southern California.
Alternatively, you can place one radiant barrier above your attic ceiling insulation and a second one below to maximize the beneficial effects in both summer and winter.
Whichever approach you choose, don’t allow any dust to accumulate on top of the reflective surface during the installation. That is why our radiant barrier insulation service includes air-sealing the barrier to make a complete envelope where no air can get in.

Other Places to Install Radiant Barriers
Radiant barriers are not only useful in standard attic spaces. They can also be installed in special roof designs, on exterior walls, and even in roofing systems. The right method depends on your home’s structure and local building codes. Below are some of the most common alternative applications where radiant barriers can give extra protection and energy savings.
Radiant Barriers in Cathedral Ceilings
Cathedral ceilings need a special installation method because they have limited space. First, unfaced insulation is placed between the rafters with at least a one-inch air gap left open for ventilation. Then the radiant barrier is stapled under the rafters. To finish, the seams are sealed with foil tape, furring strips are added, and drywall is installed. This keeps the roof ventilated while still giving the home the benefit of radiant heat protection.
“Cathedral ceilings look beautiful, but they get hot fast. A radiant barrier with good ventilation keeps the style while making the space much more comfortable.” – Beni, Senior Technician at Pure Eco Inc.
Alternative Installations by State
In some states like California, Florida, Texas, and several others, building codes allow an alternative way to install radiant barriers. Instead of placing the foil under the rafters, you can attach a double-bubble reflective insulation directly to the roof decking. Even in this case, there must always be at least a one-inch air space between the bubble insulation and the fiberglass insulation below. This option works only in the listed states and should always follow local code rules.
“Every state has different rules, and it’s important to follow them. A small change in the method can make the installation safe, legal, and effective.” – Beni, Senior Technician at Pure Eco Inc.
Radiant Barriers for Siding and House Wrap
Radiant barriers can also be used on the outside walls of a house. When installed behind brick or siding, they help reduce radiant heat from entering the home. For this to work, an air space must be created between the foil and the siding. This is usually done with thin furring strips attached over the radiant barrier before the siding is installed. A breathable version of the barrier is best in this case, because it lets moisture escape while still reflecting heat.
“Using radiant barriers in siding is like putting a shield on your walls. It keeps heat out while still letting the house breathe.” – Beni, Senior Technician at Pure Eco Inc.
Radiant Barriers in Roofing Systems
Some roofing systems, like metal, tile, or slate, are perfect for adding a radiant barrier. These roofs often have battens or counter battens that naturally create the needed air space. The radiant barrier can then be installed under the roof covering to block radiant heat. It is very important that the foil stays clean and dry. If the radiant barrier gets wet or dusty, its ability to reflect heat is reduced.
“Roofing with battens makes radiant barrier installation much easier. The built-in air gap is already there, so the foil can work at its best.” – Beni, Senior Technician at Pure Eco Inc.
How to Install a Radiant Barrier
Before installing radiant barrier insulation in your attic, adequately prepare the space and gather the necessary tools and materials. Also, create a secure working environment by ensuring safety measures are in place. This way, you can ensure a smooth and secure installation process for your radiant barrier. This section guides you through the pre-installation steps.
1. Assess the Attic Space
Start by assessing your attic space to determine its condition and suitability for radiant barrier installation. Look for any signs of moisture, leaks, or damage that may need to be addressed before proceeding. Ensure that the attic is properly ventilated to prevent the buildup of heat and moisture.
Measure the dimensions of your attic to determine the amount of radiant barrier foil and material you will need. Consider any unique features or obstacles in the attic, such as vents, chimneys, or electrical wiring, as these may require special attention during installation.
2. Gather the Necessary Tools and Materials
You will need the following tools and materials, depending on your preferred barrier foil insulation method:
- Radiant barrier material: Choose the appropriate type of radiant barrier for your needs, such as reflective foil or foil-faced insulation boards. Ensure that you have enough material to cover the entire attic space.
- Utility knife or scissors: These will be used to cut the radiant barrier material to the desired size.
- Measuring tape or ruler: Accurate measurements are crucial for properly sizing and cutting the radiant barrier material.
- Ladder: A sturdy ladder is necessary for accessing the attic safely.
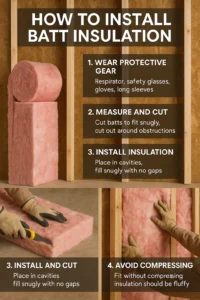
- Safety equipment: Wear protective clothing, such as long sleeves, gloves, and safety goggles, to shield yourself from potential hazards.
- Flashlight: A flashlight will help illuminate the attic, especially in areas with limited lighting.
- Staple gun and staples (for stapling method—see below): If you opt for the stapling method of installation, a staple gun will be required to secure the radiant barrier in place.
- Adhesive or spray applicator (for spray-on method—see below): If you choose the spray-on radiant barrier method, you will need an appropriate adhesive or spray applicator to apply the barrier.
3. Ensure Your Safety
Working in an attic can present various safety risks, so take the necessary precautions. First of all, ensure that the attic is well-lit to improve visibility and reduce the risk of accidents. Use a portable light source or install additional lighting if necessary.
You will also need proper ventilation. Attics can become hot and stuffy, so open windows or use fans to promote air circulation while working.
Another common problem is that attics are often cluttered, which makes it easy to trip. Make sure the attic floor is sturdy and free from debris and clear any obstructions that may cause tripping or slipping hazards. If the attic has an open or unfinished space, use a safety harness or other fall protection equipment to prevent accidents.
Also, be cautious of electrical wiring. Avoid contact with live wires and ensure that power sources are turned off when necessary.
Finally, wear appropriate protective gear, such as gloves, goggles, and a dust mask, to safeguard against potential hazards like insulation fibers or airborne particles.

RADIANT BARRIER INSTALLATION METHODS
When it comes to radiant barrier installation, there are several methods available, each tailored to suit different types of structures and budgets. The three main ones are stapling, foil-faced insulation board, and spray-on.
Method 1: The Stapling Method for Radiant Barrier Installation
The stapling attic radiant barrier installation method is a popular and straightforward approach. It involves securing the radiant barrier material to the underside of the roof rafters using a staple gun and provides an efficient and cost-effective way to enhance the energy efficiency of your home.
To successfully install a radiant barrier using the stapling method, you will first need to clear the attic space. Next, measure and cut the radiant barrier and install the first row, stapling the foil in place. Overlap and secure subsequent rows until you have covered the entire roof, making sure to address any obstacles such as ductwork.
Tips and Best Practices for the Stapling Method
To make the process more efficient, consider using a helper. One person can hold the radiant barrier in place while the other operates the staple gun.
Also, before you staple the foil, ensure that the staple gun is compatible with the thickness of the radiant barrier material. Test a few staples on a scrap piece before starting the installation to avoid jamming or incomplete penetration.
While stapling the radiant barrier, avoid compressing or flattening the insulation. Only by maintaining the recommended R-value of the existing insulation can you maximize energy efficiency.
Be especially cautious when working around electrical wiring, ductwork, or other potential hazards in the attic. If in doubt, consult a professional electrician to ensure safety.
Finally, inspect the installed radiant barrier regularly for any signs of sagging, damage, or gaps. Address any issues promptly to maintain the barrier’s effectiveness.
Method 2: Foil-Faced Insulation Board Method
The foil-faced insulation board method is another effective approach to installing a radiant barrier in your attic. It involves using rigid insulation boards with a reflective foil facing to create a barrier against radiant heat and provides a durable and effective solution to reduce radiant heat transfer.
To successfully install a radiant barrier using the foil-faced insulation board method, start with clearing the attic space. Next, measure and cut the insulation boards. Secure the boards, one at a time, and seal the joints.
During installation, you may encounter obstacles such as vents, chimneys, or electrical wiring in the attic. Cut the insulation boards to accommodate these, leaving enough space for proper airflow and functionality. Use foil tape or specialized insulation sealants to seal any gaps or seams around these areas while maintaining the integrity of the radiant barrier.
Tips and Best Practices for the Foil-Faced Insulation Board Method
Safety always comes first, so wear protective gloves and safety goggles when handling insulation boards to prevent any potential skin irritation or eye injury.
It can be hard to keep the insulation boards horizontal and maintain a consistent alignment. To help, use a straightedge or level. Also, use a foam board adhesive in addition to the fasteners to provide extra stability and prevent any movement or shifting of the insulation boards.
In addition, insulate any exposed edges or corners of the insulation boards using foam insulation strips or spray foam to prevent heat transfer and maintain the efficiency of the radiant barrier.
Finally, inspect the foil-faced insulation boards regularly for any signs of damage or deterioration and replace any damaged boards promptly to ensure the optimal performance of the radiant barrier.
Method 3: Spray-On Radiant Barrier Method
The spray-on radiant barrier method offers a convenient and versatile approach to installing a radiant barrier in your attic. It involves applying a liquid radiant barrier directly onto the underside of the roof decking or other surfaces using a spray applicator and offers flexibility and ease of application.
The first step to installing a radiant barrier using the spray-on method is to clear the attic space and prepare the area for spraying. When everything is ready, apply the spray-on radiant barrier, making sure to cover every nook and cranny and to avoid any obstacles such as ductwork. Finally, allow plenty of time for drying and curing.
Which Radiant Barrier Installation Works Best?
Not every installation gives the same results. The way you install a radiant barrier makes a big difference in how much energy you save.
Most Effective – Stapling to the Roof Rafters. Stapling the radiant barrier to the bottom of the roof rafters is the best method. It can lower the attic temperature by up to 30°F. This keeps the whole attic cooler, makes the floor insulation stronger, and protects your AC ducts from overheating. Another benefit is that your attic stays useful for storage because the barrier is up on the rafters, not lying on the floor.
Less Ideal – Laying on the Attic Floor. Putting the radiant barrier directly over the attic floor is not as effective because it does not cool down the attic air. Still, it can block up to 95% of the radiant heat from moving into the rooms below. If you use this method, it’s a good idea to also cover the AC ducts with a blanket of radiant barrier foil for extra protection.
Installation Method | How It Works | Benefits | Limits |
Stapled to Roof Rafters (Most Effective) | Foil is stapled under the roof rafters | – Lowers attic temp up to 30°F – Protects AC ducts – Helps floor insulation work better – Attic space stays free for storage | Needs more time and work to install |
Laid on Attic Floor (Less Ideal) | Foil is rolled out over the attic floor insulation | – Blocks up to 95% of radiant heat going into rooms – Easy to install – Can add an extra layer over ducts | Does not cool the attic air risk of condensation in cold climates. The attic floor is not good for storage. |
“If you want the strongest results, always go with stapling under the roof rafters. Floor installation can help, but it will never cool the attic the same way.” – Beni, Senior Technician at Pure Eco Inc.
Tips and Best Practices for Spray-On Radiant Barrier Method
Wear appropriate protective gear, including gloves, goggles, and a respiratory mask when applying the spray-on radiant barrier, and follow all safety guidelines provided by the manufacturer.
Using a high-quality spray applicator that provides consistent and controlled spray patterns for even coverage will be immensely helpful, if you have access to one. Test it first by applying a small dose of the radiant barrier product onto a small, inconspicuous area before starting the full application. This will help ensure compatibility and desired results.
If needed, apply multiple coats to achieve the desired thickness and performance—just allow sufficient drying time between coats as directed by the manufacturer.
Finally, inspect the spray-on radiant barrier regularly for any signs of damage or wear and address any issues promptly to maintain the barrier’s effectiveness.
Post Radiant Barrier Installation Considerations
Once you have successfully installed a radiant barrier in your attic, conduct post-installation inspections, perform regular maintenance, and address any repairs or issues that may arise. By staying proactive in the care of your insulation, you can ensure its long-term effectiveness and maximize its energy-saving benefits.
Inspecting the Installed Radiant Barrier
Regular inspections of the installed radiant barrier are essential to assess its condition and identify any potential problems.
Start by checking for any signs of damage, such as tears, punctures, or loose sections in the radiant barrier material. Ensure that it is properly secured and that there are no gaps or areas where the barrier has come loose.
Next, verify that the radiant barrier is aligned properly and covers the intended areas completely. Ensure that there are no areas where the barrier has shifted, leaving gaps or exposed surfaces.
Pay special attention to areas where the radiant barrier intersects with obstacles or penetrations, such as vents, chimneys, or electrical wiring. Ensure that the barrier is properly sealed around these and that there are no gaps or openings that could compromise its effectiveness.
Finally, check for any signs of moisture buildup or mold growth on or around the radiant barrier. Moisture can affect the barrier’s performance and lead to other issues, so address any sources of moisture and ensure proper ventilation in the attic space.
Maintaining and Repairing the Radiant Barrier
A well-maintained and functioning radiant barrier contributes to improved comfort, energy efficiency, and cost savings in the long run. By conducting regular inspections, performing necessary maintenance, and addressing any repairs or issues promptly, you can ensure that your radiant barrier continues to provide optimal energy-saving benefits for your home.
Consider the following practices for best results.
- Cleaning: Remove any dust, dirt, or debris that may accumulate on the surface of the radiant barrier. Use a soft brush or vacuum with a brush attachment to gently clean it and avoid any harsh chemicals or abrasive materials that could damage it.
- Sealing and Patching: If you identify any damaged or compromised areas in the radiant barrier, such as tears or punctures, promptly address them by sealing or patching them. Use foil tape or specialized radiant barrier repair products recommended by the manufacturer to ensure a proper and effective repair.
- Insulation Integrity: Ensure that the existing insulation in the attic remains in good condition and is not compressed or displaced by the radiant barrier installation. Inspect the insulation regularly and address any issues that may arise, such as settling or damage, to maintain its insulating properties.
- Moisture Management: Pay attention to the attic’s ventilation and moisture management systems. Ensure proper airflow and ventilation to prevent excess moisture buildup, which can affect the performance of the radiant barrier. Address any issues with roof leaks or condensation promptly to maintain a dry and healthy attic environment.
- Periodic Inspections: Schedule regular inspections of the radiant barrier to assess its condition and address any maintenance or repair needs. Conduct these annually or as recommended by the manufacturer or a professional.

Expert Tips on How to Install a Radiant Barrier
To make installation faster and safer, start your work at the far end of the attic and move toward the center. Cut long pieces of foil instead of many short ones, as this reduces cutting and fitting time. If you are doing the job yourself, do not try to finish in one day. Spread the work over several cooler mornings or evenings. For professionals, working in pairs or small teams makes the job go faster and easier. Also:
Leave a Small Air Gap – When you install a radiant barrier, make sure there is about ¾ inch of air space next to the shiny side. This air gap is what makes the foil reflect heat. If the foil is pressed flat, it will not work as well.
Do Not Block Attic Vents – During installation, never cover ridge vents, soffit vents, or gable vents. Your attic must stay ventilated to avoid heat and moisture problems. Keep these areas clear when you put up the radiant barrier.
Pick the Right Time to Work – If you are installing a radiant barrier yourself, plan the work in the morning or evening. Attics get very hot in the middle of the day, so cooler hours make the job safer and more comfortable.
One Layer Is Enough – Some people think that installing more than one layer of radiant barrier will save more energy. In reality, one well-installed layer is all you need for strong results.
Keep the Foil Clean and Smooth – When you install the foil, avoid sharp folds that can weaken the material. Also, make sure dust does not collect on the shiny side, because this reduces its ability to reflect heat.
Know Where It Works Best – Radiant barriers give the biggest savings in hot, sunny climates. If you install one in a cooler region, combine it with good attic insulation to get the best comfort and energy efficiency.
One mistake many people make is trying to install a radiant barrier directly under shingles or roofing felt. This does not work because the foil has no air gap. In this case, heat passes right through into the attic. If you are replacing or building a roof, the correct method is to install the barrier under the rafters or use a system that keeps a small air space open.
“The most common mistake I see is when people press the foil directly against the roof deck. Without an air gap, the radiant barrier loses most of its power. If you leave just a small space, the performance goes up a lot.” – Beni, Senior Technician at Pure Eco Inc.
When you place a radiant barrier over the attic floor, it does not cool the attic air. In colder climates, this can sometimes create a problem. Warm air from your home may meet the cold air above the barrier, and condensation can form under the foil. This extra moisture can damage insulation and reduce energy savings. If you live in a region with cold winters, it is safer to use the rafter installation method, which lowers this risk.
“A radiant barrier can save energy in any home, but in cold areas, you must think about moisture. Good ventilation and the right installation method will keep your attic safe and dry.” – Beni, Senior Technician at Pure Eco Inc.
COMMON MYTHS AND ASSUMPTIONS
There are some false assumptions concerning radiant barrier systems and how effective they are. A lot of people fear, for example, that they are so energy-efficient that they will cause excessive heat build-up in their attic.
The foil will keep your home and attic a little warmer during the winter, but it certainly won’t create an overheating problem. In fact, it keeps your attic cooler at the time of year when that’s desirable.
Others fear that their aluminum surface will corrode over time and lose its effectiveness. Tests have conclusively refuted this, as aluminum foil does not rust.
A third myth is that a radiant barrier can “cook” roofing shingles. But any heat absorbed by shingles will only raise their temperature by a few degrees. Every shingle can handle temperatures of 160 to 190 degrees Fahrenheit, so adding 5 degrees to that is hardly going to “cook” them.
Another myth is that a radiant barrier can reduce your cellular phone signal. Phone signals pass through the attic floor, walls, window glass, and more, and won’t be blocked by a thin layer of paper and aluminum.
Finally, some people think that radiant barriers can only be installed in new homes. In fact, three-quarters of the homes we put them into were built during the 20th Century.
Trust Pure Eco Inc for Your Radiant Barrier
When it comes to radiant barriers, there is no best installation method that fits all homes. The right method to install an attic radiant barrier on your house depends on your needs and specific circumstances. Contact Pure Eco Inc. today for further info and to get a free estimate for any insulation service you may need. When you call us, we will check your specifics and give you a no-obligation consultation and an accurate estimate. Find out why our customers love our efficient solutions and trust us with their radiant barrier installation!
Sources
https://www.energy.gov/energysaver/radiant-barriers
https://www.reddit.com/r/hvacadvice/comments/1b6zz80/radiant_barrier_install/
https://www.energy.ca.gov/sites/default/files/2021-03/Appendix%20D_ADA.pdf
https://www.energy.ca.gov/filebrowser/download/5212
https://www.energy.ca.gov/sites/default/files/2022-08/2022_Residential_Mandatory_Measures_Summary_ADA.pdf
https://basc.pnnl.gov/resource-guides/attic-radiant-barriers
https://rimainternational.org/pdf/barrier-placement.pdf
https://solec.org/wp-content/uploads/2018/02/Radiant-Barrier-IRCC-Performance-Report.pdf
FAQ
What is the most effective way to install a radiant barrier?
The best method is stapling the foil to the underside of the roof rafters. This lowers attic temperatures by up to 30°F, protects your AC ducts, and keeps your attic cooler overall. Laying the foil on the attic floor is easier, but it only blocks heat from moving into the rooms below and does not cool the attic air.
Can a radiant barrier cause moisture or condensation problems?
In colder climates, condensation may form if a radiant barrier is installed over the attic floor. Warm air from inside the home can meet the cold air above the barrier and create moisture. To avoid this, proper ventilation is very important, and the rafter method is usually the safer choice.
Can radiant barriers be used in cathedral ceilings?
Yes, but cathedral ceilings need a special installation. The barrier is stapled under the rafters, leaving at least a one-inch air gap for ventilation. Furring strips and drywall are then added to finish the ceiling while still allowing the barrier to reflect heat effectively.
Are there different installation rules in some states?
Yes. In states like California, Florida, Texas, and several others, codes allow a bubble-type radiant barrier to be installed directly to the roof decking. Even then, at least a one-inch air gap must be kept between the bubble insulation and the fiberglass insulation below. Always follow local building codes.
Can I use radiant barriers on siding or house walls?
Radiant barriers are also effective behind brick or siding. For this installation, furring strips are placed over the foil to create an air gap before the siding goes on. A breathable version of the barrier is best for walls because it lets moisture escape while still blocking heat.
Do radiant barriers work with roofing systems like tile or metal?
Yes. Roofs with battens or counter battens, like tile, slate, or metal, are ideal because they naturally create the air gap needed. The radiant barrier can be added under the roof covering, but it must stay clean and dry to work properly.
What should I avoid when installing a radiant barrier?
Never install the foil directly under shingles or roofing felt. Without an air gap, the barrier cannot reflect heat, and the attic will still heat up. Always install it under the rafters or in a system that leaves space for airflow.
Do I need more than one layer of radiant barrier?
No. One correctly installed layer is enough. Adding more layers will not double the energy savings.
Will a radiant barrier damage my roof shingles?
No. At most, shingles may get only a few degrees hotter, which is well within their normal safe range. Shingles are built to handle high heat and will not be harmed by a radiant barrier.
Does a radiant barrier block cell phone signals?
No. Phone signals travel through walls, windows, and floors. A thin foil layer in your attic will not block your mobile signal.
Can I install a radiant barrier in an older home?
Yes. Many radiant barriers are installed in homes built decades ago. The key is making sure your attic or roof structure is in good condition and has proper ventilation.
How long will a radiant barrier last?
Radiant barriers are made of aluminum foil, which does not rust. With proper installation and care, they can last for decades while continuing to reflect heat.